
개발자를 향해...
[실전형 리액트 Hooks] #0.0 Instruction to Hooks ~ #1.3 useTabs 본문
[실전형 리액트 Hooks] #0.0 Instruction to Hooks ~ #1.3 useTabs
eugeneHwang1124 2021. 3. 19. 13:32이 글은 노마드 코더 님의 [실전형 리액트 Hooks 10개 ]를 수강하며 작성하였습니다.
#0.0 Instruction to Nooks
자주 사용하는 hooks를 배워보자. npm 패키지를 인스톨해서 사용해보자.
그리고 hooks를 npm 에 등록할 수 있도록 한다.
#0.1 Requirements
react에 대한 이해가 있어야한다. react 와 node js가 설치되어있어야한다.
hook의 장점을 이해할 수 있어야한다.
#0.2 Workflow
hook를 자동으로 실행시켜보기 위해 codesendbox르 사용한다. 가입하고 react로 생성한다. 실시간으로 바뀌는 결과 화면을 볼 수 있다.
#1.0 instruction to useState
hook를 이용해 더이상 클래스를 사용하지 않고 함수형으로 사용할 수 있다. 두번째 값은 value를 사용할 수 있다. useState를 살펴보자.
hook 에서 화살표 함수를 사용해보자.
import { StrictMode } from "react";
import ReactDOM from "react-dom";

import "./styles.css";

function App() {
  return (
    <div className="App">
      <h1>Hello code</h1>
      <h2>Start editing to see some magic happens</h2>
    </div>
  );
}

const rootElement = document.getElementById("root");
ReactDOM.render(<App />, rootElement);
위와 같은 index.js파일에서 시작해보자.
useState는 초기에 state를 initialState를 세팅할 수 있는 옵션을 제공한다. App에 const useState를 사용해보자.
아래 코드에서 item, setItem과 같은 이름을 주는 것은 선택사항이다. 원하는 이름을 아무거나 사용할 수 있다. useState는 배열을 리턴해야한다. item만 사용하고 싶으면 const item=useState(1)을 사용하면 된다. 아래코드와 같이 작성하면 useState를 부른 곳에 리턴이 가능하다.
function App() {
const [item, setItem] = useState(1);
return (
<div className="App">
<h1>Hello {item}</h1>
<h2>Start editing to see some magic happens</h2>
</div>
);
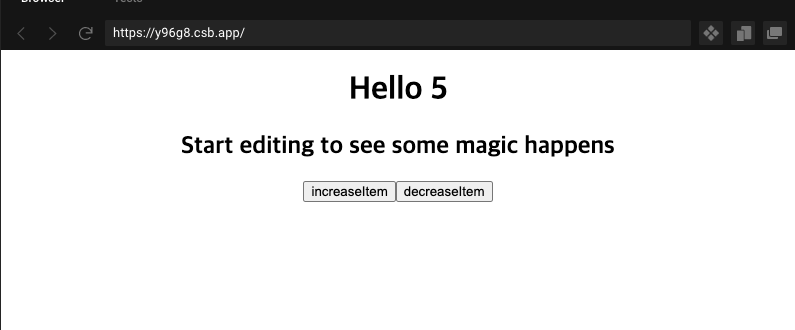
}또한 hook에서는 함수를 화살표 함수로 바꿀 수도 있다. 이제 incrementItem을 만든다. 이건 setItem에 값을 하나 더한 값을 넣는 변수이다. 이와 같이 decrementItem변수도 만들자 이건 item값보다 1 작은 값을 가진 변수이다. 이제 렌더링 부분에 버튼을 생성하고 onclick에 incrementItem, decrementItem을 연결하자.
import { StrictMode, useState } from "react";
import ReactDOM from "react-dom";

import "./styles.css";

const App = () => {
  const [item, setItem] = useState(1);
  const increaseItem = () => setItem(item + 1);
  const decreaseItem = () => setItem(item - 1);
  return (
    <div className="App">
      <h1>Hello {item}</h1>
      <h2>Start editing to see some magic happens</h2>
      <button onClick={increaseItem}>increaseItem</button>
      <button onClick={decreaseItem}>decreaseItem</button>
    </div>
  );
};

const rootElement = document.getElementById("root");
ReactDOM.render(<App />, rootElement);
버튼이 잘 작동하는 것을 볼 수 있다. 코드가 많이 깔끔하다. class component로 바꾸어보자. hook를 사용하기 전에는 state를 함수형으로 사용할 수 없었다. 이제는 return에 뿌려주고 그 위에 적어놓기만 하면 된다. 함수를 하나 더 만들어주자.
class AppUgly extends React.Component {
  state = {
    item: 1
  };
  render() {
    const { item } = this.state;
    return (
      <div className="App">
        <h1>Hello {item}</h1>
        <h2>Start editing to see some magic happens</h2>
        <button onClick={this.increaseItem}>increaseItem</button>
        <button onClick={this.decreaseItem}>decreaseItem</button>
      </div>
    );
  }
  increaseItem = () => {
    this.setState((state) => {
      return {
        item: state.item + 1
      };
    });
  };
  decreaseItem = () => {
    this.setState((state) => {
      return {
        item: state.item - 1
      };
    });
  };
}
코드가 매우 길어진 것을 볼 수 있다.
이렇게 코드를 간단하게 만들어주기 때문에 hook가 필요하다.
#1.1 useInput
useInput은 그냥 기본적으로 input을 업데이트 한다. 코드 작성에 앞서 App의 return에서 Hello를 제외한 모든 부분을 삭제한다.
useInput의 초기변수를 하나 넣어주고 이 초기 변수를 초기값으로 하는 useState변수 value를 선언한다.
App부분의 리턴에 <input>을 넣어주고 입력창의 기본값을 위에서 선언한 useInput으로넣어준다.
import { StrictMode, useState } from "react";
import ReactDOM from "react-dom";
import React, { Component, setState } from "react";
import "./styles.css";

const useInput = (initialValue) => {
  const [value, setValue] = useState(initialValue);
};

const App = () => {
  const name=useInput("Ms.")

  return (
    <div className="App">
      <h1>Hello</h1>
      <input placeholder="Name" />
    </div>
  );
};

const rootElement = document.getElementById("root");
ReactDOM.render(<App />, rootElement);
이제 중요한 것은 App의 이 부분에 어떤 변화를 주기 전에 기본값을 value와 함께 리턴해보자. useInput에 리턴값으로 value를 준다. 그러면 App에서 name은 useInput이 리턴한 value를 가지게 된고 값도 value가 가지고 있는 값을 지니게 된다.
const useInput = (initialValue) => {
  const [value, setValue] = useState(initialValue);
  return { value };
};

const App = () => {
  const name = useInput("Ms.");

  return (
    <div className="App">
      <h1>Hello</h1>
      <input placeholder="Name" value={name.value} />
    </div>
  );
};
<input placeholder="Name" value={name.value} /> -1
대신에
<input placeholder="Name" {...name} /> -2
을 쓸 수 있다. name이 가지고 있는 모든것을 보여주게 된다.
이제 onChange 이벤트는 event를 가지고 있다. console에서 event를 볼 수 잇다. 1처럼 작성하면 onChange는
<input placeholder="Name" value={name.value} onChange={name.onChange}/>
로 쓸 수 있는데 이 코드를
<input placeholder="Name" {...name}/>
로 바꿀 수 있다.
import { StrictMode, useState } from "react";
import ReactDOM from "react-dom";
import React, { Component, setState } from "react";
import "./styles.css";

const useInput = (initialValue) => {
  const [value, setValue] = useState(initialValue);
  const onChange = event = () => {
    console.log(event.target);
  };
  return { value, onChange };
};

const App = () => {
  const name = useInput("Ms.");

  return (
    <div className="App">
      <h1>Hello</h1>
      <input placeholder="Name" {...name} />
    </div>
  );
};

const rootElement = document.getElementById("root");
ReactDOM.render(<App />, rootElement);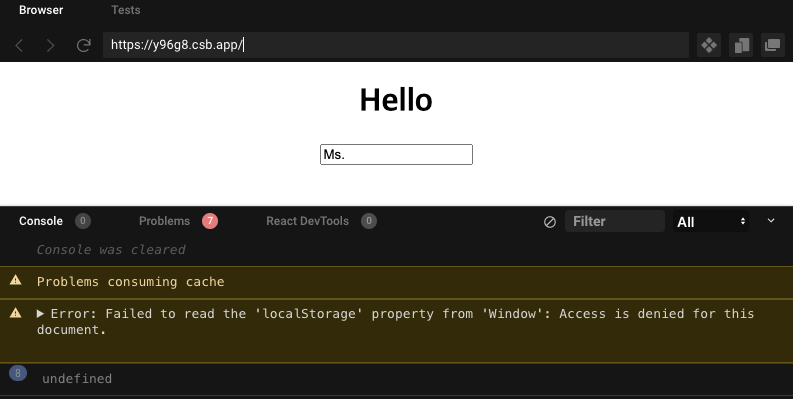
이벤트를 다른 함수에처 처리할 수 있다는 점에서 혁명적이라고 할 수 있다.
#1.2 useInput part 2
이제 위에서 만든 useInput을 npm에 등록하여 다른 사람들이 쓸 수 있도록 해보자.
useInput에서 초기 변수에 valid를 추가하여 유효성을 검증하는 기능을 포함시켜보자.
validator 함수에 있는 value로 maxLen을 전달한다. name을 사용해서 useInput에 Mr와 maxLen을 넣어준다. 매번 validator가 바뀌고 타입이 function이면 willUpdate에 validator의 결과를 업로드한다. 따라서 value의 길이가 10보다 작으면 true가 된다. 즉 우리가 업데이트를 할 수 있는 것이다.
const useInput = (initialValue, validator) => {
  const [value, setValue] = useState(initialValue);
  const onChange = (event) => {
    const {
      target: { value }
    } = event;
    let willUpdate = true;
    if (typeof validator === "function") {
      willUpdate = validator(value);
    }
    if (willUpdate) {
      setValue(value);
    }
  };
  return { value, onChange };
};

const App = () => {
  const maxLen = (value) => value.length <= 10;
  const name = useInput("Ms.", maxLen);

  return (
    <div className="App">
      <h1>Hello</h1>
      <input placeholder="Name" {...name} />
    </div>
  );
};
initialValue를 이용하는 대신 함수를 써서 특정 문자를 입력할 수 없도록 하자.
onst useInput = (initialValue, validator) => {
  const [value, setValue] = useState(initialValue);
  const onChange = (event) => {
    const {
      target: { value }
    } = event;
    let willUpdate = true;
    if (typeof validator === "function") {
      willUpdate = validator(value);
    }
    if (willUpdate) {
      setValue(value);
    }
  };
  return { value, onChange };
};

const App = () => {
  const maxLen = (value) => value.length <= 10;
  const name = useInput("Ms.", maxLen);

  return (
    <div className="App">
      <h1>Hello</h1>
      <input placeholder="Name" {...name} />
    </div>
  );
};
10글자 이상을 입력하면 더이상 입력되지 않는다.
maxLen부분을 다음과 같이 바꾸면
const maxLen = (value) => !value.includes("@");
@는 입력할 수 없게 된다.
#1.3 useTabs
위에서 작성한 코드를 hook으로 만들어보자.
const 로 배열을 두가지 만든다. 그리고 배열을 map을 이용해서 버튼을 만든다.
import { StrictMode, useState } from "react";
import ReactDOM from "react-dom";
import React, { Component, setState } from "react";
import "./styles.css";

const content = [
  {
    tab: "section 1",
    content: "i'm the content of the section 1"
  },
  {
    tab: "section 2",
    content: "i'm the content of the section 2"
  }
];

const App = () => {
  return (
    <div className="App">
      <h1>Hello</h1>
      {content.map((section) => (
        <button>{section.tab}</button>
      ))}
    </div>
  );
};

const rootElement = document.getElementById("root");
ReactDOM.render(<App />, rootElement);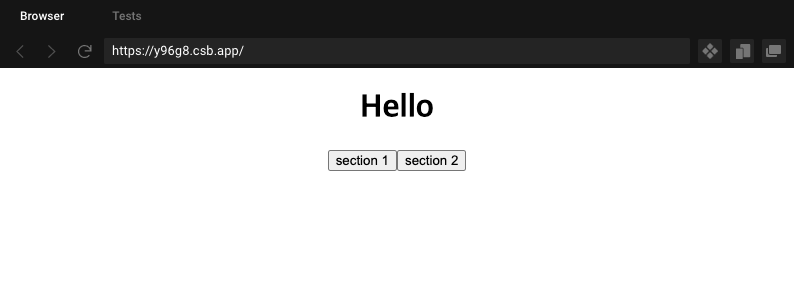
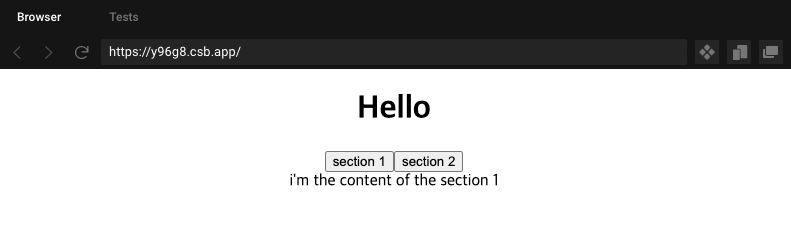
이제 버튼을 누르면 현재 누른 버튼의 인덱스를 얻도록 해보자. 그리고 배열이 아닐 경울 종료하는 함수를 작성한다.
const content = [
  {
    tab: "section 1",
    content: "i'm the content of the section 1"
  },
  {
    tab: "section 2",
    content: "i'm the content of the section 2"
  }
];

const useTabs = (initialTab, allTabs) => {
  if (!allTabs || !Array.isArray(allTabs)) {
    return;
  }
  const [currentTndex, setCurrentIndex] = useState(initialTab);
  return {
    currnetItem: allTabs[currentTndex]
  };
};

const App = () => {
  const tabs = useTabs(0, content);
  return (
    <div className="App">
      <h1>Hello</h1>
      {content.map((section) => (
        <button>{section.tab}</button>
      ))}
    </div>
  );
};
이제 여기서 버튼을 누르면 값이 변화되도록 하자.
import { StrictMode, useState } from "react";
import ReactDOM from "react-dom";
import React, { Component, setState } from "react";
import "./styles.css";

const content = [
  {
    tab: "section 1",
    content: "i'm the content of the section 1"
  },
  {
    tab: "section 2",
    content: "i'm the content of the section 2"
  }
];

const useTabs = (initialTab, allTabs) => {
  if (!allTabs || !Array.isArray(allTabs)) {
    return;
  }
  const [currentIndex, setCurrentIndex] = useState(initialTab);
  return {
    currnetItem: allTabs[currentIndex],
    changeItem: setCurrentIndex
  };
};

const App = () => {
  const { currnetItem, changeItem } = useTabs(1, content);
  return (
    <div className="App">
      <h1>Hello</h1>
      {content.map((section, index) => (
        <button onClick={() => changeItem(index)}>{section.tab}</button>
      ))}
      <div>{currnetItem.content}</div>
    </div>
  );
};

const rootElement = document.getElementById("root");
ReactDOM.render(<App />, rootElement);
여기에 render 함수가 없지만 render는 버튼을 누를 때마다 된다는 것을 알 수 있다.
'웹 자바스크립트 공부 > ReactJS + node.js' 카테고리의 다른 글
| [실전형 리액트 Hooks] #2 USEEFFECT (0) | 2021.03.21 |
|---|---|
| [초보자를 위한 리덕스 101] #4.0 Redux Toolkit ~ #4.5 Conclusions (0) | 2021.03.10 |
| [초보자를 위한 리덕스 101] #3.4 Deleting To Do ~ #3.6 Conclusions (0) | 2021.03.10 |
| [초보자를 위한 리덕스 101] #3.2 mapStateToProps ~ #3.3 mapDispatchToProps (0) | 2021.03.09 |
| [초보자를 위한 리덕스 101] #2.2 Delete To Do ~ #2.4 Conclusions (0) | 2021.03.09 |


